


Featured Post
Turn Old Furniture into New Treasures: A DIY Guide to Revival and Care
Overview
Ever looked at that scratched coffee table or sagging armchair and thought, 'What if I could fix it myself?' Turning old furniture into new treasures isn't just a weekend project—it's a way to save money, reduce waste, and add personal charm to your space. In this guide, we'll explore simple DIY fixes, upholstery care secrets, and tips to keep your pieces shining for years. Get ready to roll up your sleeves and transform your home.
Why Bother Reviving Old Furniture?
I remember the day I hauled my grandmother's old oak dresser into my apartment. It was beat up, with chipped paint and a drawer that stuck like glue. But instead of tossing it, I decided to give it a go. That piece now sits proudly in my bedroom, a reminder of family and my own handiwork. You see, old furniture holds stories. Reviving it keeps those tales alive while cutting down on the clutter of new buys.
Plus, it's budget-friendly. A new sofa can set you back thousands, but with some elbow grease, you can refresh yours for under $50. And let's not forget the eco-angle—repurposing means less stuff in landfills.
Start small if you're new to this. Pick one piece that bugs you the most, like a wobbly side table or a faded headboard on your bed. Success there builds confidence for bigger jobs. Over the years, I've turned a rickety bed frame into a cozy retreat and a torn-up ottoman into a conversation starter. The key? Patience and the right know-how.

DIY Furniture Repair: Simple Fixes for Common Problems
Let's dive into the hands-on stuff. DIY furniture repair doesn't require a workshop full of gadgets. Most fixes use items from your garage or a quick store run. I'll walk you through common issues with steps anyone can follow.
Fixing Scratches and Dents
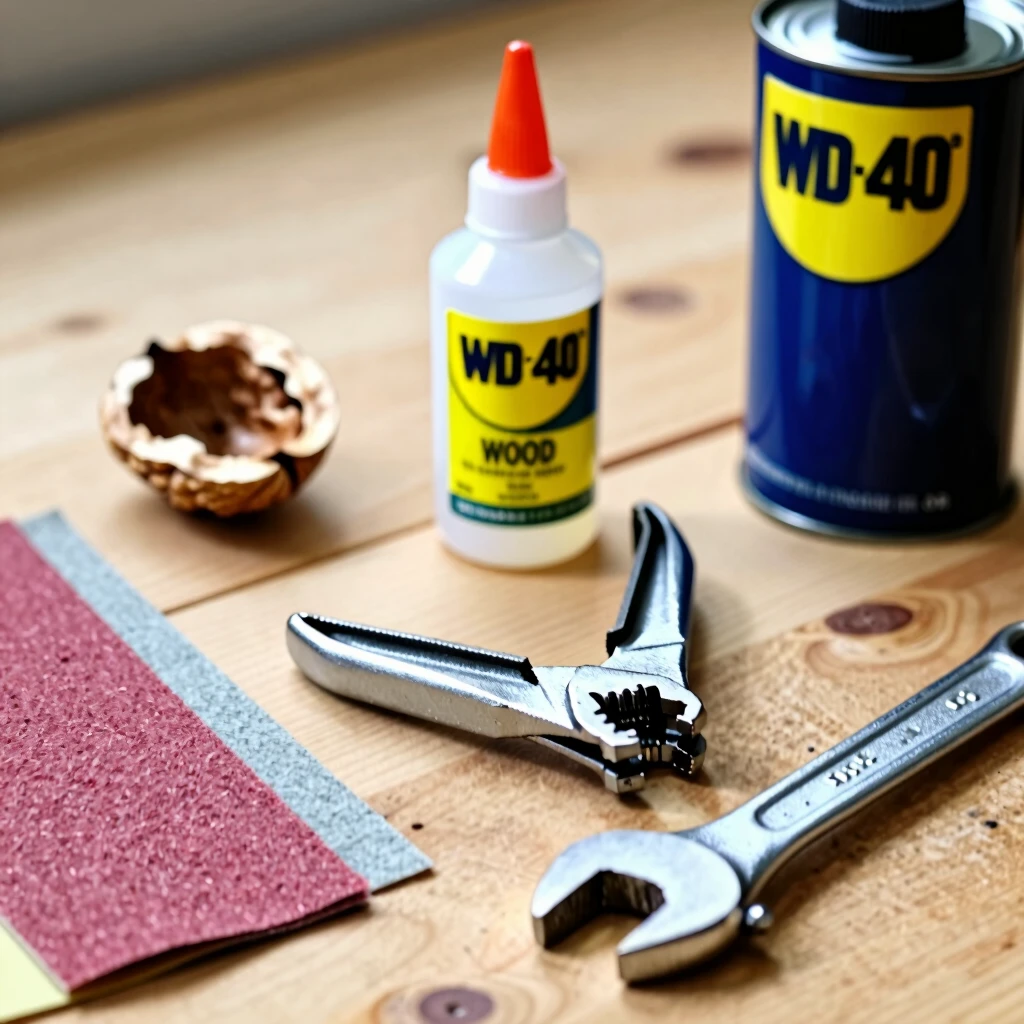
Scratches happen—pets, kids, or just time. For wood pieces, grab some walnuts (yes, the nuts!). Rub the meaty inside over the mark; the oils blend with the wood to hide it. For deeper dents, mix baking soda and water into a paste, apply, and let it dry before sanding lightly.
I once saved a dining table this way after my cat decided it was a scratching post. Buff with olive oil afterward for shine.
Tightening Loose Joints
Wobbly chairs or tables? Check the joints. Unscrew if possible, then add wood glue and clamps overnight. For glued spots, tap in wooden dowels after drilling small holes.
Pro tip: Use a rubber band around the screw head for extra grip if it's stripped.
| Problem | Tools Needed | Quick Fix |
|---|---|---|
| Scratches | Walnut or baking soda paste, sandpaper | Rub and buff |
| Loose Joints | Wood glue, clamps, dowels | Glue and clamp overnight |
| Squeaky Bed Frame | WD-40 or soap | Spray hinges, wipe excess |
Reviving a Squeaky Bed
Beds deserve special mention—they're where we recharge. A creaky frame disrupts sleep. First, inspect for loose bolts; tighten them with a wrench. For wooden slats, rub bar soap on rubbing spots to quiet friction.
My old bed squeaked like a horror movie until I flipped the mattress and oiled the springs. Now it's silent as a whisper.
These fixes take under an hour each. Practice on scrap wood first if you're unsure. Sites like Woodrich Brand's Furniture Repair 101 offer video demos for visual learners.
The Definitive Guide to Upholstery Maintenance
Upholstery is the soft side of furniture—cushions, seats, backs. Neglect it, and your treasures turn threadbare fast. But with routine care, they last decades. Think of it as grooming your pet: regular attention keeps them happy.
Daily Habits
Vacuum weekly with an upholstery attachment. It grabs dust bunnies before they grind into fabric. Spot-clean spills right away—blot, don't rub. For fabrics, use a mix of dish soap and water; leather gets a damp cloth with conditioner.
Rotate cushions monthly. This evens out wear. Keep furniture out of direct sun; UV rays fade colors like a bad sunburn. I learned this the hard way with a beloved loveseat that went from red to pink in a year.
Deep Cleaning
Every six months, tackle the big stuff. For removable covers, toss in the wash on gentle. Otherwise, rent a steam cleaner or call pros for tough grime.
Here's a simple schedule: - Weekly: Vacuum and fluff pillows. - Monthly: Rotate and air out. - Quarterly: Spot treat stains. - Yearly: Professional deep clean if needed.
For tough odors, sprinkle baking soda, let sit overnight, then vacuum. Works wonders on pet smells. According to Nesco Upholstery's maintenance tips, consistent care doubles fabric life.

Furniture Care Tips for Long-Lasting Quality
Beyond repairs and cleaning, smart habits seal the deal. These tips apply to all pieces, from beds to bookcases.
-
Humidity Control: Wood warps in dry air, cracks in humid. Use a humidifier in winter; dehumidifier in muggy summers. Aim for 40-60% humidity.
-
Gentle Handling: Lift, don't drag. This saves legs and floors.
-
Polish Sparingly: Overdo it, and residue builds up. Use beeswax every few months for natural protection.
For beds specifically, choose breathable linens to protect the frame. Wash mattress pads monthly. I swapped my synthetic sheets for cotton, and my wooden headboard thanks me—no more moisture woes.
Invest in felt pads under legs. They glide smoothly and prevent scratches. Small change, big impact.
Store smart too. If moving, wrap pieces in blankets. For seasonal storage, elevate off floors to dodge dampness.
Drawing from Dr. Sofa's 10 Tips for Restoring Old Furniture, always assess before acting. A quick check reveals hidden issues.
Advanced Projects: From Repair to Reupholster
Once comfy with basics, level up. Reupholstering a chair starts with staples and fabric scissors. Remove old cover, note the pattern, cut new pieces, and staple taut.
My first try was a dining chair. It took two days and a few ripped seams, but the velvet finish? Chef's kiss. Start with thrift finds—they're low-stakes practice.
For beds, recover the headboard with batting for plushness. Foam adds comfort to benches. Tools: staple gun, pliers, sewing machine optional.
Safety first: Wear gloves, ventilate for paints. And celebrate wins—a fresh coat of paint on that dresser? Instant treasure.
Common Mistakes and How to Avoid Them
Don't rush stripping finish; it flakes. Sand between coats instead. Skip cheap glues—they fail fast.
Over-cleaning fabrics strips oils, leading to brittleness. Balance is key.
I've botched a few: Glued the wrong joints once, turning a table into modern art (upside down). Laugh, learn, retry.
Turning It Personal: Adding Your Touch
Revived isn't just fixed—make it yours. Paint in bold hues, add stencils, or mix fabrics. That bed? I carved initials on the frame for whimsy.
These touches turn functional into fabulous.
Summary
Turning old furniture into new treasures starts with simple steps: assess, repair, maintain. From DIY fixes for scratches to upholstery routines, you've got the tools to succeed. Your home will thank you with cozy vibes and savings. Grab that sandpaper and start today—what piece calls to you first?